> For the complete documentation index, see [llms.txt](https://participanthelp.dscout.com/llms.txt). Markdown versions of documentation pages are available by appending `.md` to page URLs; this page is available as [Markdown](https://participanthelp.dscout.com/getting-started/dscout-app/screen-recording-walkthrough.md).
# Screen recording walkthrough
Some studies will include questions that require you to record your screen and audio. These questions often ask you to complete a given task outside of the Dscout app. By recording your screen and audio, researchers can get a better understanding of your experience completing the study.
Screen recording looks a little different between iOS and Android devices. The sections below lay out what you can expect for your specific device.
## Mobile screen recording
{% hint style="info" %}
**Note:** Regardless of your device, always use the latest version of the Dscout app for the smoothest experience.
{% endhint %}
### Screen recording on iOS
**Tip:** Before beginning a screen recording, we recommend turning on Do Not Disturb to ensure no personal notifications make their way in. Your entire screen will be recorded, so depending on your notification settings, any that appear on your screen during the recording will be visible.
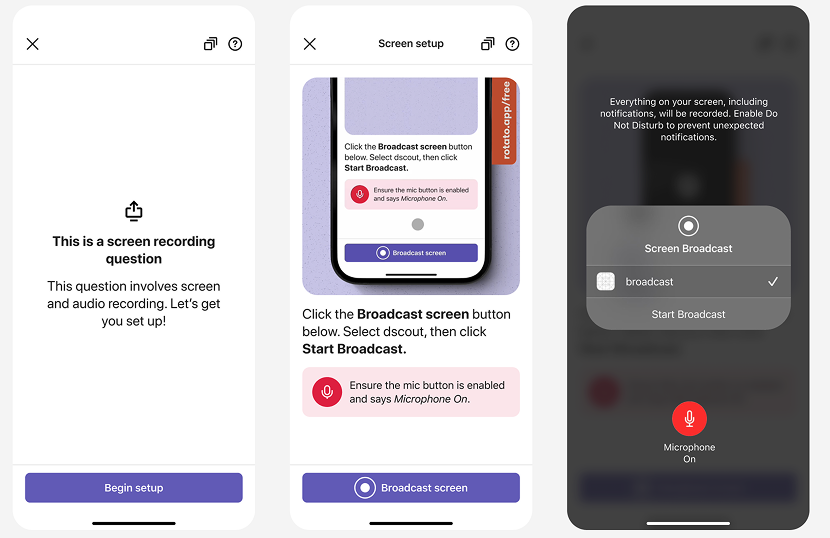
When you encounter a screen recording question using the Dscout iOS app, you’ll be prompted to complete the necessary setup, which includes granting permission to record your screen and record your audio.
To start, tap **Begin setup**, then tap **Broadcast screen**. On the next screen, tap **Microphone on,** then **Start broadcast**. The app will then test your audio to ensure it’s captured properly.
 {% hint style="info" %}
**Note:** You won’t be able to start a screen recording question until the Dscout app verifies your audio. If audio verification fails, you may be sent back to the start of setup.
{% endhint %}
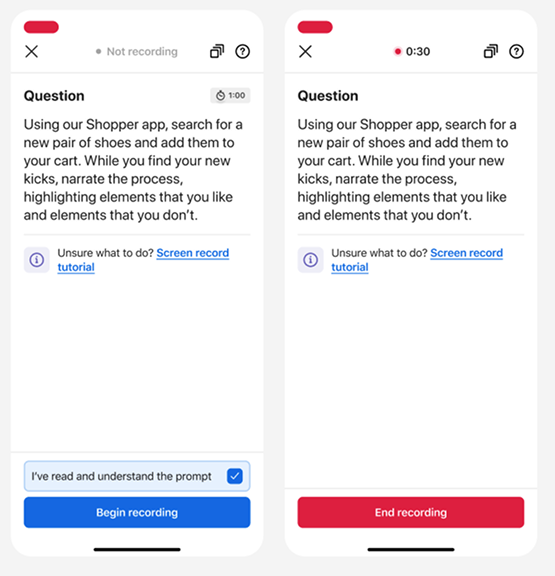
Once you’ve completed the setup process, you’ll receive a quick tutorial on what to do next, but your recording won’t start just yet. Once you’ve reviewed the question itself, tap **Begin recording** to start recording your screen. Follow the provided instructions and return to the Dscout app once complete. Then, tap **End recording** to stop recording your screen.
{% hint style="info" %}
**Note:** You won’t be able to start a screen recording question until the Dscout app verifies your audio. If audio verification fails, you may be sent back to the start of setup.
{% endhint %}
Once you’ve completed the setup process, you’ll receive a quick tutorial on what to do next, but your recording won’t start just yet. Once you’ve reviewed the question itself, tap **Begin recording** to start recording your screen. Follow the provided instructions and return to the Dscout app once complete. Then, tap **End recording** to stop recording your screen.
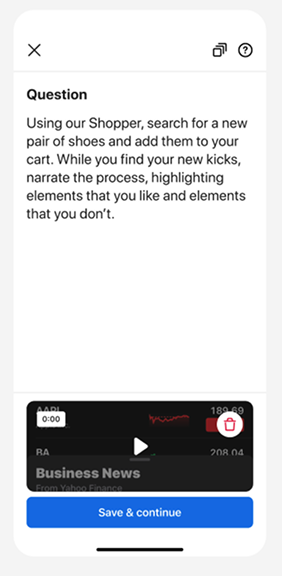
 With your recording complete, you’ll have the option to review it directly in the Dscout app. To submit it and move forward in the study, tap **Save & continue**. If something went wrong with the recording, tap the **trash** icon to start over. Don’t worry about being perfect, though, and only re-record if you ran into an issue.
 ### Screen recording on Android
**Tip:** Before beginning a screen recording, we recommend turning off any notifications you may receive during the study. Your entire screen will be recorded, so depending on your notification settings, any that appear on your screen during the recording will be visible.
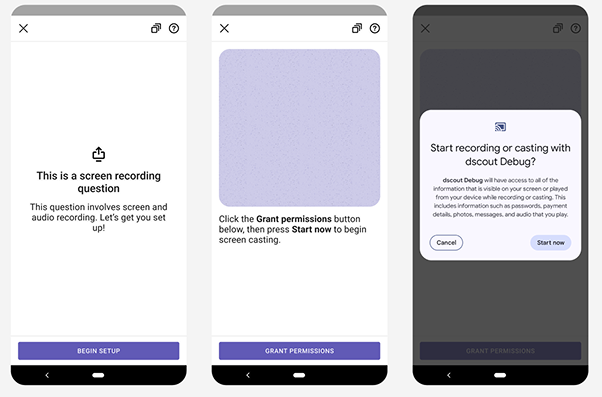
When you encounter a screen recording question using the Dscout Android app, you’ll be prompted to complete the necessary setup, which includes granting permission to record your screen and record your audio.
To begin, tap **Begin setup**, then tap **Grant permissions**. When asked to start recording or casting with Dscout, tap **Start now** to test your audio.
### Screen recording on Android
**Tip:** Before beginning a screen recording, we recommend turning off any notifications you may receive during the study. Your entire screen will be recorded, so depending on your notification settings, any that appear on your screen during the recording will be visible.
When you encounter a screen recording question using the Dscout Android app, you’ll be prompted to complete the necessary setup, which includes granting permission to record your screen and record your audio.
To begin, tap **Begin setup**, then tap **Grant permissions**. When asked to start recording or casting with Dscout, tap **Start now** to test your audio.
 {% hint style="info" %}
**Note:** You won’t be able to start a screen recording question until the Dscout app verifies your audio. If audio verification fails, you may be sent back to the start of setup.
{% endhint %}
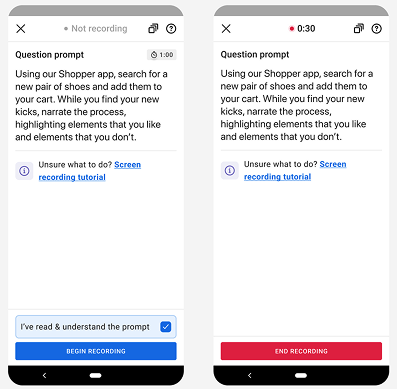
Once you’ve completed the setup process, you’ll receive a quick tutorial on what to do next, but your recording won’t start just yet. Once you’ve reviewed the question itself, tap **Begin recording** to start recording your screen. Follow the provided instructions and return to the Dscout app once complete. Then, tap **End recording** to stop recording your screen.
{% hint style="info" %}
**Note:** You won’t be able to start a screen recording question until the Dscout app verifies your audio. If audio verification fails, you may be sent back to the start of setup.
{% endhint %}
Once you’ve completed the setup process, you’ll receive a quick tutorial on what to do next, but your recording won’t start just yet. Once you’ve reviewed the question itself, tap **Begin recording** to start recording your screen. Follow the provided instructions and return to the Dscout app once complete. Then, tap **End recording** to stop recording your screen.
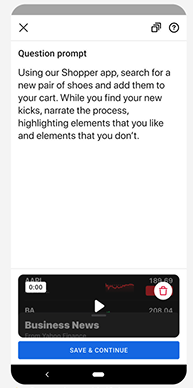
 With your recording complete, you’ll have the option to review it directly in the Dscout app. To submit it and move forward in the study, tap **Save & continue**. If something went wrong with the recording, tap the **trash** icon to start over. Don’t worry about being perfect, though, and only re-record if you ran into an issue.
 ## Desktop screen recording
During some desktop studies, you'll be asked to record your screen while answering a specific question. In some cases, you'll be asked to visit a specific webpage (provided during the study) before starting your recording. In others, you'll start your recording without a specific webpage to visit. Here's what you can expect in either instance:
### If a webpage is provided
**To record your screen when given a specific website to visit:**
1. When you reach the screen recording question, click **Go to Website**. The Dscout browser extension is displayed.

## Desktop screen recording
During some desktop studies, you'll be asked to record your screen while answering a specific question. In some cases, you'll be asked to visit a specific webpage (provided during the study) before starting your recording. In others, you'll start your recording without a specific webpage to visit. Here's what you can expect in either instance:
### If a webpage is provided
**To record your screen when given a specific website to visit:**
1. When you reach the screen recording question, click **Go to Website**. The Dscout browser extension is displayed.

2. In the browser extension pop-up, click **Start recording**. The share screen modal is displayed.

3. Select **Entire screen**. Then, click **Share**.

Now, a countdown appears. When that countdown ends, your screen is being recorded. You can view the duration of your recording in the browser extension pop-up. To end the recording, click the **Stop** button.

### If no webpage is provided
**To record your screen when a webpage is not provided:**
1. When you reach the screen recording question, the Dscout browser extension will automatically open.
2. Click **Got it!** in the browser extension pop-up.

3. Click **Start recording** in the browser extension pop-up. The share screen modal is displayed.

4. Select **Entire screen**. Then, click **Share**.

Now, a countdown appears. When that countdown ends, your screen is being recorded. You can view the duration of your recording in the browser extension pop-up. To end the recording, click the **Stop** button.

---
# Agent Instructions
This documentation is published with GitBook. GitBook is the documentation platform designed so that both humans and AI agents can read, navigate, and reason over technical content effectively. Learn more at gitbook.com.
## Querying This Documentation
If you need additional information that is not directly available in this page, you can query the documentation dynamically by asking a question.
Perform an HTTP GET request on the current page URL with the `ask` query parameter, and the optional `goal` query parameter:
```
GET https://participanthelp.dscout.com/getting-started/dscout-app/screen-recording-walkthrough.md?ask=&goal=
```
`ask` is the immediate question: it should be specific, self-contained, and written in natural language.
`goal` is optional and describes the broader end goal you are ultimately trying to accomplish on behalf of the user. GitBook uses it to tailor the answer towards what is most useful for that goal.
The response will contain a direct answer to the question and relevant excerpts and sources from the documentation.
Use this mechanism when the answer is not explicitly present in the current page, you need clarification or additional context, or you want to retrieve related documentation sections.